
How to Butcher a Hog – Pig Butchering Step By Step
Traditionally hogs were killed in November when the temperature stayed cool. Since people didn’t have freezers, they depended on the cool fall and winter months to help preserve the butchered hog while it cured. Scalding hot water should be prepared before the hog has been killed. Once the hog has been dispatched, the water is poured over its body in order to loosen its hair and make it easier to remove.
Planning for Butchering
Once the hog has been killed, it has become a perishable food item. As such, one should take great care in making sure that all tools used in the butchering and cleaning process have been well cleaned.
As with most things, preparation is an important aspect of any endeavor, and butchering a hog is no different. It’s important that you make sure you have everything set up and in good working order beforehand. You will either need a smokehouse or freezer, depending on how or if you want to cure the meat beforehand. You will also need a good set of knives, a heavy table, scolding hot water, the means to move the carcass, whether with the aid of a machine or human strength.
A good set of butchering knives should consist of a sticking knife, skinning knife, boning knife, butcher knife, cleaver, bell scrapers, meat saw, and meat hooks. You may also find it advantageous to have some butchering paper at hand if you are planning on sticking it straight into the freezer after the butchering process is complete.
The Hog
Hogs have been raised all throughout the United States. They were heavily prized not just for their meat but also for their fat which was used for a large variety of purposes, from cooking to making soap. Besides their versatility, they were also prized in southern regions for their ability to forage on their own and reproduce quickly, not to mention that they grow quickly and can efficiently turn grain and vegetable matter into savory meat.
Selection of Hogs for Butchering
The quality of meat largely depends upon the breed of hog, its diet, and weight. Properly fattened hogs that weigh between 180 to 250 lbs. and are around nine months old are considered the best for home butchering. The reason is that hogs of this size are relatively easy to handle, the meat chills out more quickly, and they produce medium-weight cuts that tend to cure more quickly. Medium-weight hams, shoulders, and bacon are finer in texture and flavor and are of better quality than those from older, heavier hogs. If you are raising your own hogs (I am assuming so), it’s also more economical to slaughter them at this weight since heavier (400 to 600 lbs), older hogs consume more feed per pound added than their younger and lighter counterparts.
Care of Hogs before Butchering
Meat curing starts before the hog is ever killed. Much of the flavor of the meat is dependent on the hog’s diet as well as how the hogs were handled when butchered, bled, cleaned, and chilled. For example, up until the early 1900s, many southern people allowed their hogs to run free in the hills and forage for acorns, chestnuts, and other local vegetation. Each hog had an identifiable mark, such as a notch cut in its ear in order to identify to whom it belonged. In fact, one of the many quarrels between the infamous Hatfield and McCoy families was over one such “free-range” hog.
However, although this free rang diet was inexpensive to the farmer, it did not lend itself to producing good meat. This was largely attributed to their consumption of acorns, which were associated with giving the meat a bitter taste, and led to poor quality fat that was inconsistent and difficult to render. As such, many farmers found it advantageous to round up some of their hogs several weeks to a month before they were to be butchered and feed them a diet consisting largely of corn and other grain.
As with most animals, Hogs shouldn’t be butchered when they are over-heated, excited, or fatigued. Rather they should be calm, quiet, and well-rested. If the hog is over-heated, stressed, and or fatigued at the time of its demise, this can cause off-flavors in the meat. It’s also important that the meat is “chilled” soon after being butchered. Failure to do so can also lead to off-flavors in the meat.
Chilling
There are two main reasons why chilling the meat is so important. The first (and most obvious) reason is bacteria. Although cold temperatures won’t kill bacteria, they will prevent them from multiplying. These bacteria must be held in check until the curing action of the salt and other ingredients take effect. This is another reason why preparation is so important. The second the hog is dispatched, the race begins between you and the bacteria.
Another reason chilling is so important has to do with the natural chemical reactions that take place in the muscle tissue after the animal (hog in this instance) has died. Muscle tissue is incredibly complex and only works under a narrow range of physical conditions. That is to say, once the animal dies, the conditions suitable for maintaining healthy muscle tissue (blood circulation, oxygen, temperature, etc.) deteriorate. For example, once the animal’s circulatory system shuts down, lactate gradually builds up in the muscle tissue causing the pH of the tissue to decline. A rapid decline in pH can have major impacts on meat quality. Lowering the temperature of the meat slows this process and, as such, reduces the rate of pH decline, e.g., leads to better tasting meat.
Important factors for producing quality meat:
- Hogs are calm and rested before being dispatched.
- The hog is thoroughly bled before butchering.
- The meat is quickly chilled once the hog has died.
- Proper application of the salt and other ingredients used in the curing process (if you choose to cure the meat).
- Proper washing, drying, and wrapping of the meat after the curing process.
Humane Methods of Dispatching a Hog
This isn’t a topic that I’m particularly keen on discussing. Although I have dispatched my share of meat animals, it’s not something I have ever relished (primarily because I’m not a psychopath). However, humans are naturally meat-eaters, and I’m not going to give up bacon. With that being said, let us delve into the difficult issue of dispatching a hog.
There are many methods for dispatching a hog. My preferred method is to use a firearm. This is also the preferred method used by our local butcher, who uses a .22 rifle placed at the hog’s head. It’s the quickest, surest, and most humane way to kill a hog (or any animal) that I can think of. And as previously stated, it’s important that the hog is calm and relaxed before being dispatched.
Other popular methods of dispatching hogs are to “stick them” or by hitting them in the back of the head with large internments, such as a sludge hammer or splitting maul.
“Sticking them” refers to the use of a knife in dispatching the hog. Though I have never done this, I know people who have. These people have claimed that it’s a quick and relatively painless way to dispatch animals, though I disagree. These people do admit that the animal (Hog, sheep, goat, etc.) has a habit of panicking when it’s held down. Something that I find to neither be “humane” nor lead to quality meat. Furthermore, in some states, “sticking” wild boars is illegal due to the fact that it’s deemed as being “inhumane.” What makes it inhumane for a wild boar yet humane for a domesticated hog is beyond me.
As previously stated, I hold that the best and most humane method is the use of a firearm. One that is preferably fired either to the back of the animal’s head (hog or otherwise) or fired between its eyes. As previously stated, it’s also the preferred method of our local butcher.
Shortly after the hog has been dispatched, it should have its throat cut and hanged upside down so that the blood can efficiently drain out. When the bleeding has slowed, the hog should then be transferred to the “scalding area.”
Scalding
The main purpose of scalding is to help remove the pig’s fur (in much the same way it’s done to chickens in order to remove the feathers). Seasoned veterans will often have what’s known as a “Scalding Tank.” This consists of a large tank (typically a metal bathtub) that is full of hot water. The hog is then lowered into the scalding tank until its hair can be easily scared away with the use of a somewhat dull knife. However, don’t fret if you don’t have a scalding tank. This process can also be done by simply pouring hot water over the hog (though you will need more of it).
For the best results, the water should be around 160° degrees F. However, one should be careful not to leave the hog in the scalding tank too long, or the hair may “set.” If you don’t have a scalding tank, it is advisable that you cover the hog with burlap sacks or other cloth that will help hold in the heat and prevent all the water from flowing off. Another trick that is commonly used is to apply wood ash to the hot water. Since lye can be rendered from wood ash and is caustic, I assume this has some correlation to the reason this is done. I have also heard of people using lye for the same purpose. HOWEVER, given the fact that lye is caustic and can behave unpredictably when introduced to water, I would NOT recommend its use.
Scraping
A specialty tool called a “Bell Scraper” is commonly used for scraping hogs. Although a good quality bell scraper can save time, a knife with a “not so sharp edge” will also suffice. When scraping, it’s advisable that one start with the head and feet since they cool first. The scraping strokes should be made with the lay of the hair, and it will come off easier. Once the hair is removed, pour some hot water over the carcass and use a stiff bristle/wire brush to remove any dirt or stray bristles.
Skinning
One can, of course, avoid scalding and scraping by simply skinning the hog. Skinning is a relatively simple process. All one must do is pull/cut the skin away from the animal’s body. It was really as simple as pulling on the skin and cutting it away. With that being said, it is advantageous to either hang the animal up before skinning. Most people (especially if they are roasting the whole pig at once) prefer to use the scald and scrapping method.
Hanging the Hog
Once you have removed all of the hog’s hair, your next step will be to remove its head and entrails. This is easiest to do once the hog has been strung up. There are obviously many ways to hang up a hog. Regardless of which method you use, it’s best to make sure that the hog’s head is facing the ground.
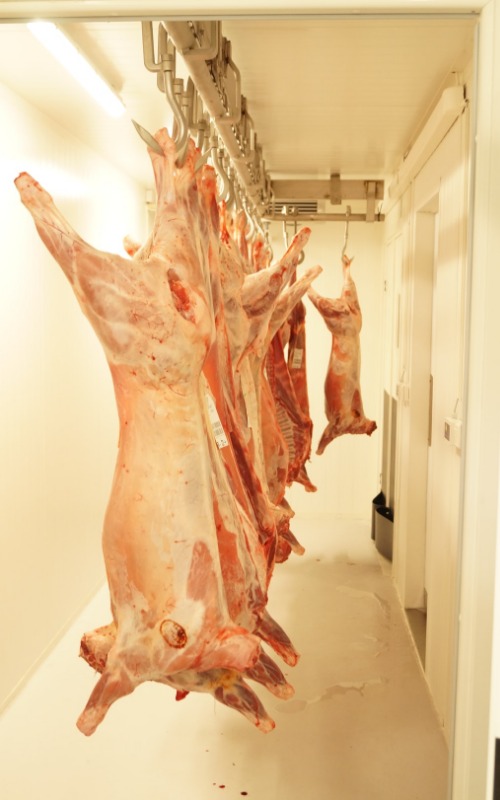
Though you can hang a hog with the use of a chain, ropes, or hooks, the traditional/backcountry way is with the use of a thick stick (referred to as a “gambling stick”) that is pressed in between the tendons and the hog’s back legs.
A gap between the tendon and the leg is made by making a deep cut up through the center of the hind legs starting from the foot toward the hock. It’s in this area that three tendons will be found. Work these tendons out and hook over the gambling stick. You can then lift the hog either by the use of a chain or a large pole. Once the hog is hung up, be sure to thoroughly wash the carcass by first using hot water and a scrape and then rinsing with cold water.
Once this is done, you are ready to start dressing/gutting the hog. However, before making your first cut, it’s important to make sure that all of the knives and utensils that you are using have been thoroughly cleaned. If you are doing this in the fall/winter, insects such as flies should be a minimal issue. However, if you are going to it in the spring/summer, it will be something to prepare for. You can minimize insects by doing butchering in an enclosed area and/or with the use of smoke.
Removing the Head
Removing the head aids in the drainage of blood from the hog, as well as accelerating the chilling process. Removing the head is done by making a cut just above the ears at the point where the first joint of the backbone meets the head. Follow the cut all the way across the back of the hog’s neck, in doing so, severing the hog’s gullet and windpipe. After completion, the hog’s head should drop free with minimal effort.
Cutting the Belly
The first cut will start between the hams and continue all the way down to the throat. It’s important that you don’t cut through the belly wall or through the other intestines. Doing so may lead to contamination of the meat. Once this is done, use your knife to split the breast bone. In doing so, divide the first pair of ribs. With older/larger hogs, you may need to use a saw in order to split the breast bone. It’s at this point that any blood which may have accumulated in the chest cavity will drain out upon the breast bone being split.
The intestines will fall out once you have cut through the belly. There again, make sure that you don’t puncture the hog’s stomach or intestines. However, the intestines won’t fall far since they will be held in place by muscle fiber and sinew. You will need to carefully cut through the muscle fiber still holding up the intestines. Once this is done, the intestines should fall free.
Splitting the Aitch Bone
The “Aitch Bone” (also known as the rump bone) must be cut in order to remove the legs. This can either be done with a knife or a saw for older/larger hogs. Splitting the Aitch Bone is done by cutting through the center of the two hams. Once your knife makes contact with the aitch bone, you then place the tip of the knife against the center seam of the bone. The bone can then be split by striking the butt of the knife. As previously mentioned, for larger hogs, one may require a saw.
Splitting the Hog
Splitting the hog in half leads to better and easier cuts (as in cuts of meat). Once all of the hog’s intestines have been carefully removed, and the inside of the carcass has been thoroughly washed, you are then ready to split the carcass in half. This is generally done with either the use of a saw or cleaver. Split the carcass down the middle, starting between the hog’s hind legs, and cut/saw downwards towards the neck.
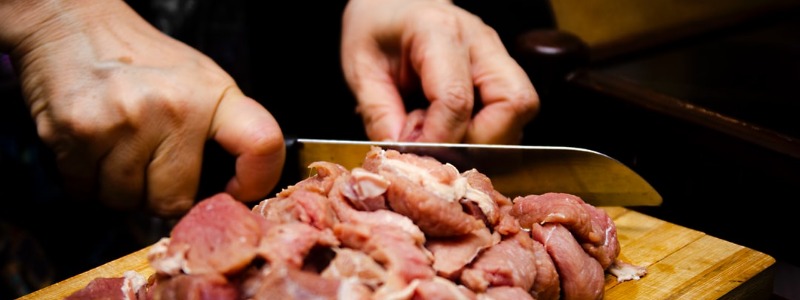
Making the Cuts
Once the hog has been split into two, it can be more easily handled and cut into smaller portions. For this, you will need a sharp knife and saw for cutting through the meat, tendons, and joints. The main sections of the pig are the head, shoulder, back, middle cut, belly, and ham. Larger cuts are generally made from the ham, back, and shoulder.
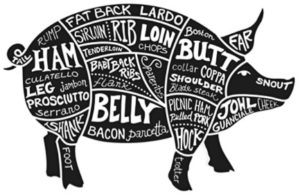
The middle cut (ribs) can be made as large as you want to depend on the size of the hog and the rib bones. The belly is typically cut into long thin slices, commonly known as bacon. The lower section of the front legs, known as the “hock,” may be cut crosswise against the bone with the use of a saw. The lower section of the hind legs (known as the shank) is also generally cut against the bone with the use of a saw. The shank is larger than the “hock” and is generally used for making a nice roast.