
Growing Potatoes (from Potatoes)
Potatoes are relatively easy to grow. However, there are a few things that you should be aware of before diving headfirst into your illustrious career as a potato-growing hobbyist. Below are some simple tips and tricks to make sure that you get started off on the right foot.
 1. Getting ready to plant potatoes
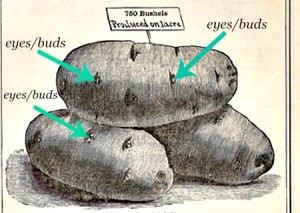
The really cool thing about growing potatoes is that one potato can produce several plants. You will want to first place your seed potatoes in a place between 60-70 degrees F, where they will get plenty of sunlight. Doing so will get your potatoes ready to start sprouting. The day before planting, you will want to start cutting your potatoes into pieces. Each piece should be around 2 inches squared and should have two eyes/buds per piece. Smaller potatoes (golf ball sized or smaller) do not need to be cut.
2. Seed Potatoes
What is the difference between a regular potato and a “seed potato?” Well, I’m happy you asked. A store-bought potato is for eating, whereas a seed potato is for planting. The main difference is that a store-bought potato may have been treated so that it won’t sprout. The last thing a grocery store wants is for its inventory to literally start growing on the shelf. In comparison, seed potatoes have not been treated and are usually sold with a guarantee that they are organic, GMO-free, and disease-free.
Another difference is that store-bought potatoes may contain diseases and viruses. Said diseases may not be harmful to humans, but they are the last thing you want in your garden. With that being said, a lot of people have used store-bought potatoes to start their garden with little to no trouble. (Click Here for Red Pontiac Seed Potatoes)
3. When to plant
What I love most about growing potatoes is that they are hardy and can be started in the early spring. The best time is when the soil temperature is around 45 degrees F. The really great thing about Potatoes is that you can generally plant and harvest more than one crop a year. With your first crop being planted in the early spring and your second crop in mid-June.
4. Watering potatoes
Potatoes will need about 2 inches of water every week. However, you will want to stop watering when the potato leaves start to turn yellow.
5. Soil for growing potatoes
Potatoes like loose, well-drained soil that is moist but not overly saturated with water. They also need a lot of sunlight. I have noticed that horse manure that has been composted for several months works great when mixed in with the soil. The horse manure provides a good structure to the soil that is perfect for growing potatoes.
6. Planting potatoes
There are many methods for planting potatoes. You can either grow them in raised rows that are spaced a couple of feet apart and about 9 inches high. My preferred method is to grow them in large raised bins that I make out of pallets. There are also potato bags that are, well, bags designed for growing potatoes. (Click Here for Grow Bag Potato Planter)
The best tried and true method that I am aware of is to plant the potatoes about 2 inches deep. I then gently pile several more inches on top of that once they start producing some good and healthy-looking sprouts.
7. Storing potatoes
The best method for storing a large number of potatoes is to keep them in a root cellar. A root cellar can be as simple or as complicated as you want to make it. The ideal storage environment is for them to be kept in a place that is dark, well ventilated, and with a stable temperature between 35-40 degrees F. With that being said, some varieties of potatoes keep better and longer than others.
8. Soil rotation
One downside to growing potatoes is that they suck a lot of nutrients out of the soil. As such, you will need to let the soil sit for a couple of years before planting a new crop. However, if you are willing to get creative, this problem can be somewhat mitigated. My recommendation is to grow potatoes in raised narrow beds and then mix the soil in with your compost at the end of the season.
For example, I have a large compost/worm bin. Every fall, I pick out my red worms and start my compost. I use the soil from my potato garden as a base. I then cover that with fallen leaves mixed in with a liberal amount of horse manure. I then throw in my red worms and let them go to work breaking down the manure and leaves. The nutrients from the compost filter down into the soil below, making it suitable for planting in the spring. I use one-third soil, one-third leaf, and one-third horse manure. I then add table scraps to this mixture over the course of the fall and winter.